This manual will help you through the setup of a VPNXS vpn connection.
In this tutorial we will be using Powershell
When you are in Windows, locate PowerShell
(x86)
 |
When PowerShell (x86) has started you have to type one of the following commands: add-vpnconnection -Name VPNXS -ServerAddress connect.vpnxs.nl add-vpnconnection -Name VPNXS UK -ServerAddress connect.uk.vpnxs.nl |
  |
In order to use the vpn connection, we need to change some settings.
|
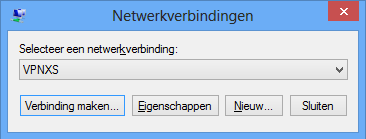 |
If you have more option to choose for, pick the one you have created earlier in this guide. |
 |
In this window select the second tab "options" |
 |
Here you can choose to store username and password, if you do this you don`t have to type in your password everytime you want to connect to VPNXS. Then click on PPP-Settings and put a check mark on the second option to enable software compression.
|
 |
Make sure that the drop down menu "Type VPN" says PPTP (Point to Point Tunneling Protocol) |
You should now be able to login to VPN by clicking on Connect.... and a new windows should pop-up
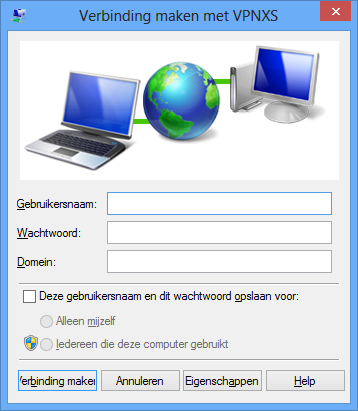 |
Here you need to fill in your username and password, which you will find in the email you received from us. |